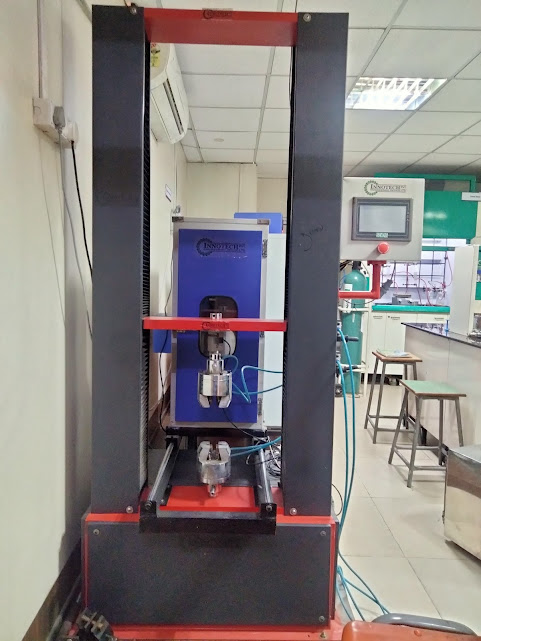
METAL PIPES,PLASTICS,Flexural Test/Bend Test,Plastic/Rubeer&Rope
Technical Specifications:-
Capacity: 50 kN
Frame Stiffness: 95 kN/mm
Clearance between columns (horizontal Daylight) : 400 mm (Minimum)
Provision for measuring range : Upto 50 kN
Load cell Accuracy: Accuracy: +/- 0.5% of applied force, and (+/-) 0.5% of reading down to 0.5% or better of full scale. Range :0.2% to 100% for all the load cells (together from 100 N to 50kN maintaining +/-0.5% accuracy).
Internal sampling rate: 1000 sample/sec or better with ASTM E83 & ISO 5893 and to accuracy within 1 %.
High Precision Load cells & coupling 50 kN (1 no.) & 5 kN (1 no.) of L.C. 0.005 N or better with adapter for easy load cell attachment & grips
Crosshead Travel Min. 1000 mm
Cross Head Speed Resolution Min. 0.001 mm/min
Cross Head Speed Accuracy 0.1 % of set speed
Crosshead Position Accuracy: 0.05%
Straining / Testing speed ( at no Load/Full load)
Will be 500 mm/min (Straining at variable speed)
Extensometer (Mechanical – Contact Type)
Measuring range: Long travel Extensometers up to 700mm or more to measure strain by means of knife edges which contact the sample till break. Gauge length of 10 mm, 15mm, 20mm, 25mm, 50mm should be provided.Supplied unit must meet ASTM E83 & ISO 5893 and to an accuracy within 1 %.
Least count 0.01 mm
Arm travel: specimen through failure, Lightweight to minimize any influence on the test, Low operating tracking force - Rugged construction to withstand rigors of operation, The strain should be used to control the machine in a closed loop feedback controlled mode
Grips & Fixtures for Plastic/Rubeer&Rope sample testing:
The machine has versatile removable grips and fixtures so that it can be changed quickly to meet variable requirements in tension, compression, flexure etc. and should be Pneumatic and Self-tightening wedge grip as per ASTM D 638, IS 4984:2016, IS 12235 (Part 13):2004 and ISO 4427:2019 etc.
Pneumatic grip 25 x 50 mm up to 5 KN or higher capacity for rubber & polymeric samples.
Provision of special gripping for Rope Samples. (up gradation for future scope of utilization: not to quote).
Provision for LVDT compress meter and Deflect meter compatible for use with above compression platen and bend fixtures as per ASTMD 695. Provisions for creep testing of DWC pipes with suitable LVDT device integrate with main testing software. (up gradation for future scope of utilization: not to quote)
Provision for Heavy Duty Vice Grip for 20kNor woven sacks as per IS 14968, IS 14887 and HDPE Geo-membrane as per ASTMD 6392 . (up gradation for future scope of utilization: not to quote)
Printer & PC graphs enable study the behavior of the material.
Motor driven threaded columns for quick effortless adjustment of lower cross-head-to facilitate rapid fixing of test specimen.
Jog controller for hand held interface and through PC.
USB or any suitable port to transfer data to computer for analysis/storage evaluation etc
Standard Accessories
TENSILE TEST FOR METALPIPES SPECIMEN :- Flat specimens up to 20 mm thickness & 50 mm width. Grip head arrangements for the tensile Specimen of metal with throat area available with Shank length of different diameters :- (Tensile Test Method IS 1608 / ISO 6892) .
TENSILE TEST FOR PLASTICS SPECIMEN :- Grips & Fixtures (as per ASTM / ISO standards for Plastics, Elastomers, Fibers, FRPs, Films) -For all load cells (50 kN, &5kN )
TENSILE TEST FOR ROUND SPECIMEN :- Clampimg Jaw for Round Specimen of Diameter Up to & including 9 mm dia.
MPRESSION TEST :Pair of compression plates of diameters Min. 150 mm dia. with Max. 50 kN capacity or better.
Flexural Test/Bend Test: 3 point Bend fixture with span continuously variable from 30mm to 200mm or more and roller diameter 4mm/10 mm and length of loading bars 50mm or more & complies with ASTMD 790. 14 Grips & Fixtures for Plastic/ Rubber &Rope sample testing.
Strain Unit
Suitable encoder of minimum display resolution 0.001 mm r. Data acqusition rate for displacement measurement should be kHz
Tension, Compression, bending, transverse and shear test mode to be conducted between lower cross head and table
Provision for rapid change the position of lower cross head by operating screwed column for easy fixing of specimen. (up gradation for future scope of utilization: Not to quote)
Data Acquisition & Software
Material testing Software with Metal & Plastic Module with methodic data base Data Acquisition & Software ·
Real-time image, stress-strain curve, load deformation, load-time curve, load/strain, Young Modulo us etc. shall be displayed by the software.
The upper and lower yield, maximum breaking and strain, breaking/elongation ratio of selecting point etc. required be supplied from graphic.
Software shall record and generate test report. The software shall have wide range of process. Test results can be displayed in Metric and System International (SI) system.
Automatic zeroing at the beginning of the test and auto return facility after specimen failure is required
All test results to be displayed on the screen. System has option for automatic break detection. Software will compatible with extensometer Data analysis, statistics, point tracing, superimposing graph for comparison will be available User programmable method in software for shear, Peel, tear, friction, cyclic loading and creep test will be provided.